Halloween is right around the corner now - managed to find 1 pre-carved pumpkin in my decorating stash and plopped that into the window (guess we'll call it done for this year).
I have been commissioned to sew a custom costume - unfortunately it is needed for next weekend, guess I will be doing a marathon sewing session tomorrow; but tonight is all mine. Time to get started on Christmas gifts for family and friends. Not giving away too much information but I am thinking ornaments - hand sculpted. I am trying multiple brands of polymer clay to see which ones work for me as well as testing different paints. More details as I progress on the trials.
Thursday, October 20, 2016

Saturday, October 15, 2016
Candle making sucess - well sort of
After a bit of study, some patience and a healthy dose of trial and error I think I've got it. A nearly perfect pour on my candle. I will admit that the white area of wax near the top is entirely my fault. I knocked over the candle right after I filled up the cooling well.

I completed the test burn, I would say the results came out about average. In a nutshell here is what I have learned and will now apply to further candle making adventures.
#1 A pint jar will surprisingly take 16 oz or 1 pound of wax to fill
#2 Warm up your container prior to filling
#3 Pour your candle at a slightly warmer temperature (poured mine at 180 degrees)
#4 Be prepared to fill the void (cooling well) left around the wick as the wax cools and shrinks
#5 If using straight paraffin do not add a hardener such as stearine (stearic acid) The wax will be too too hard to burn properly.
#6 I used a wick rated for pillars 2 inches to 3.5 inches in diameter - this is a bit too small. I need to use the next size up.
#7 If using a good quality scent be prepared to use a maximum of 1 oz of liquid scent per pound of wax. Coffee was the aroma of choice for this adventure therefore using the entire ounce makes a pleasant scented candle lit or not - some fragrances will be altogether too strong for this amount.
Lastly and most importantly remember to relax, take your time -working safely and enjoy the creative process.
Friday, October 7, 2016
Container Candle Folly
Time to start thinking Christmas gifts. My family has always made our gifts to friends and each other (don't get overwhelmed it doesn't happen 100% of the time) and seeing that it is now October I had better get going. Nearly everyone loves a candle right - even if you don't light it a well scented candle generally is appreciated. On to the fun -
I've done it before and not always with the best of success. What does any crafting junkie do first; check Pinterest. Overwhelming contradicting information Aargh!! Ok I'm smarter than that, time to check the candle making suppliers. After all you should know how to use the products you are selling - some information there. Oh well lets dive in worst case scenario I end up with an ugly candle that won't burn and I will have to remelt the wax. I do know enough to not burn my house down.
Heat the wax to the proper temperature add colorant remove from heat cool a little add desired scent stir gently pour and voila candle.

Ok #1 paraffin wax shrinks when cool had to add additional wax to fill well - oops used all the color used a bit of white. Notice the lines across the candle near the bottom and the odd cloudy bit near the top. Not a perfect pour inconceivable according to various trouble shooting guides, could be caused by wax was poured at to low of a temperature - or the container was too cool and the candle hardened to rapidly. I can work with that. Now on to a burn test......

#2 See how this candle is melting the wax only in the center, if allowed to continue to burn you would "drown" the wick in the puddle of wax and if by chance you got it to keep burning it would melt out the core only. Back to the trouble shooting charts: the advice use a larger wick - I know the wick should be the correct size for this candle. Possibility # 2 the wax is too hard , I must admit I added stearin to the paraffin this is a chemical the will increase the burn time by hardening the wax. The solution add beeswax to soften. Got it two minor corrections to make. Candle put back in the double boiler to melt the wax out of the container - make my corrections and start again.
I've done it before and not always with the best of success. What does any crafting junkie do first; check Pinterest. Overwhelming contradicting information Aargh!! Ok I'm smarter than that, time to check the candle making suppliers. After all you should know how to use the products you are selling - some information there. Oh well lets dive in worst case scenario I end up with an ugly candle that won't burn and I will have to remelt the wax. I do know enough to not burn my house down.
Heat the wax to the proper temperature add colorant remove from heat cool a little add desired scent stir gently pour and voila candle.

Ok #1 paraffin wax shrinks when cool had to add additional wax to fill well - oops used all the color used a bit of white. Notice the lines across the candle near the bottom and the odd cloudy bit near the top. Not a perfect pour inconceivable according to various trouble shooting guides, could be caused by wax was poured at to low of a temperature - or the container was too cool and the candle hardened to rapidly. I can work with that. Now on to a burn test......

#2 See how this candle is melting the wax only in the center, if allowed to continue to burn you would "drown" the wick in the puddle of wax and if by chance you got it to keep burning it would melt out the core only. Back to the trouble shooting charts: the advice use a larger wick - I know the wick should be the correct size for this candle. Possibility # 2 the wax is too hard , I must admit I added stearin to the paraffin this is a chemical the will increase the burn time by hardening the wax. The solution add beeswax to soften. Got it two minor corrections to make. Candle put back in the double boiler to melt the wax out of the container - make my corrections and start again.
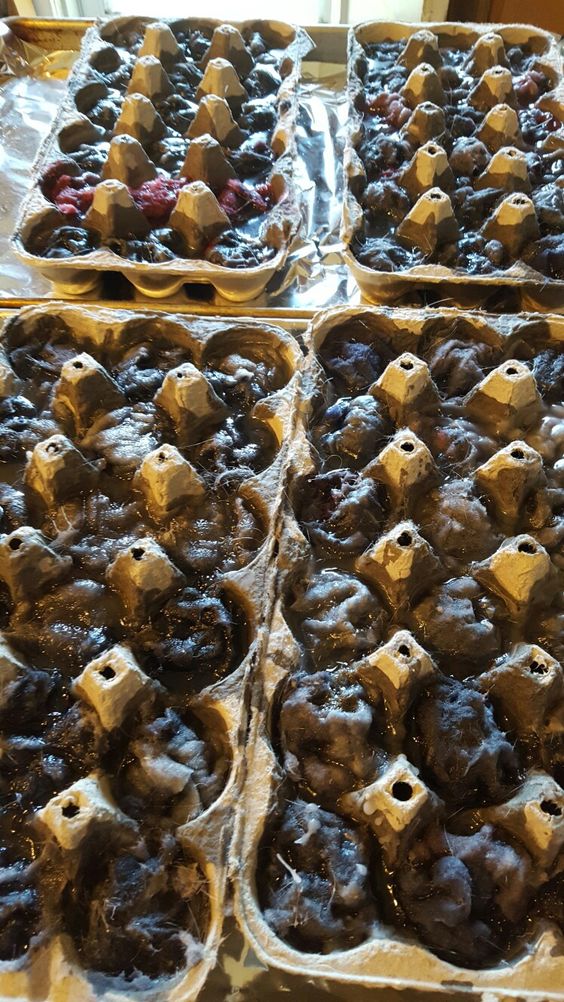
The lint fire starters are done. They aren't the most beautiful ; but if they work I can overlook the cosmetic unpleasantries. I did manage to create a total of 72 - according to the information I found one starter should burn for 15-17 minutes. A match or lighter will be required to get these going. Hope to try one soon. As an added bonus I used all the old wax up.
Sunday, October 2, 2016
I've been busy busy busy - September has flown by and now it is time for Fall crafts, winter prep and assorted projects. Currently I am finishing the last of the alterations on a wedding gown. The Bride has an infusion pump and needs access on the wedding day. I am adding two disguised pockets into the sides, hopefully when I am done you won't see anything from the outside.
Today I am about to make some dryer lint fire starters, cross your fingers I will be able to make a dent in the old wax in my pot. I want fresh for Christmas projects.
Today I am about to make some dryer lint fire starters, cross your fingers I will be able to make a dent in the old wax in my pot. I want fresh for Christmas projects.
Sunday, September 4, 2016
Blog Focus
Well it took me a little longer than an afternoon to figure things out. Since I seem to have trouble focusing on just one discipline I will share information and experiences as they happen.
Be warned I tend to multi-task, actually there tends to be a minimum of six projects being worked at once.
As of September 4, 2016 on the urgent pile: My niece's homecoming dress, a custom fit undershirt for my brother, a life size emperor penguin sculpture. Within the next two weeks I need to strip/repair/ frame and install an antique front door - followed closely by a new basement exit door same work required. The garage roof needs to the stripped, repaired and re-shingled. The flower garden needs some attention weeds and mulching and it looks like I have honey bees using a corner of the porch as a hive.Looking to the future I am in the planning stages of a beaded flapper dress.
All the while working on the last fine art challenge issued by my Grandmother - she challenged me to complete the entire alphabet in art, A and B are done and C (Cleopatra lounging on chaise) a large format oil painting is in process.
Coming up next: Lessons learned, machine embroidery on chiffon and organza.
Be warned I tend to multi-task, actually there tends to be a minimum of six projects being worked at once.
As of September 4, 2016 on the urgent pile: My niece's homecoming dress, a custom fit undershirt for my brother, a life size emperor penguin sculpture. Within the next two weeks I need to strip/repair/ frame and install an antique front door - followed closely by a new basement exit door same work required. The garage roof needs to the stripped, repaired and re-shingled. The flower garden needs some attention weeds and mulching and it looks like I have honey bees using a corner of the porch as a hive.Looking to the future I am in the planning stages of a beaded flapper dress.
All the while working on the last fine art challenge issued by my Grandmother - she challenged me to complete the entire alphabet in art, A and B are done and C (Cleopatra lounging on chaise) a large format oil painting is in process.
Coming up next: Lessons learned, machine embroidery on chiffon and organza.
Saturday, September 3, 2016
Saturday, March 9, 2013
Referral Guilt
Spring is right around the corner and new projects are springing up faster than the plants will - once the snow is gone. I am still working on some long term vintage sewing projects. I have a few new ideas floating around in my head. I will have to get them down on paper and into the planning and construction stage so I can have new ones .. LOL
Well on the the referral guilt. ( fictional names have been used to protect the privacy of those involved - but needed to follow story) I work at a large art and craft store and one of my customers who I will name Jan planned to have a padded cornice recovered - she had asked me initially to complete the project and at the time I was overloaded with projects and I just did not have the time. That was O.K. this Jan had received a name of another seamstress in town from a competitor; for this story we will refer to her as Beth. I recognized the name; I had worked for this company for a short while and I had seen Beth's work, very professional and well done. Long story shorter - Jan came back to my store the other day to buy new fabric. Beth totally botched the job - the fabric that was initially used was ruined and not reusable. Jan purchased new fabric, the cornice is 18 inches high and 9 feet long, the fabric chosen was of a good quality and the price reflected it. At this time Jan asked me to recover the cornice again. Right now my schedule allows it so off I go.
I do feel bad - logically I should not based on the work I have seen I had no reservations. It really upsets me that a "professional" would take on a job that they were not able to complete in a suitable manner - it does make things that much harder for everyone else. Not only does one have to ease their fears and calm them, but you need to repair or alter someone Else's mess. (I am climbing down from my soap box"
I just got the first layer of fabric and trim off - ugh. The original fabric was still underneath . All the fabric is off and I am looking at a thin layer of batting that will have to be beefed up before I add the heavy upholstery fabric. I will have pictures of my progress in a bit.
Well on the the referral guilt. ( fictional names have been used to protect the privacy of those involved - but needed to follow story) I work at a large art and craft store and one of my customers who I will name Jan planned to have a padded cornice recovered - she had asked me initially to complete the project and at the time I was overloaded with projects and I just did not have the time. That was O.K. this Jan had received a name of another seamstress in town from a competitor; for this story we will refer to her as Beth. I recognized the name; I had worked for this company for a short while and I had seen Beth's work, very professional and well done. Long story shorter - Jan came back to my store the other day to buy new fabric. Beth totally botched the job - the fabric that was initially used was ruined and not reusable. Jan purchased new fabric, the cornice is 18 inches high and 9 feet long, the fabric chosen was of a good quality and the price reflected it. At this time Jan asked me to recover the cornice again. Right now my schedule allows it so off I go.
I do feel bad - logically I should not based on the work I have seen I had no reservations. It really upsets me that a "professional" would take on a job that they were not able to complete in a suitable manner - it does make things that much harder for everyone else. Not only does one have to ease their fears and calm them, but you need to repair or alter someone Else's mess. (I am climbing down from my soap box"
I just got the first layer of fabric and trim off - ugh. The original fabric was still underneath . All the fabric is off and I am looking at a thin layer of batting that will have to be beefed up before I add the heavy upholstery fabric. I will have pictures of my progress in a bit.
Wednesday, January 30, 2013
It has been some time since I last checked in. The 1912 project has ended so to speak.. I still have projects to complete and look forward to finding the time to get them done.
Winter is in full swing and I was glad to get the house buttoned up right before the snow started flying. Today is the 4th major snowstorm of the season. I am fortunate enough to work for a company that values its' employees more than most - I was sent home when the road conditions started to deteriorate. I celebrated the end of 2012 with the knowledge that my roof no longer leaks, I finally decided on room size rugs for the living and dining room and ordered them. Most importantly Grandma is healthy and doing well.
Now on to 2013 - many large projects on the horizon. The theatre company I work for is doing well and I continually receive new projects to complete. For this summer I need to draft and sew 3 vintage football uniforms for their production Curly Lambeau era 1919-1949 leaves a wide range of dates to look at. Right now I am sewing a Valentine pillow; if everything goes right it should look like a box of chocolates. Then it is on to 2 men's suit coats - Elvis styled. Perhaps after that I will have time to finish the Go Go dress design I have been working on. I will post a few pictures when I finish the smaller projects.
Winter is in full swing and I was glad to get the house buttoned up right before the snow started flying. Today is the 4th major snowstorm of the season. I am fortunate enough to work for a company that values its' employees more than most - I was sent home when the road conditions started to deteriorate. I celebrated the end of 2012 with the knowledge that my roof no longer leaks, I finally decided on room size rugs for the living and dining room and ordered them. Most importantly Grandma is healthy and doing well.
Now on to 2013 - many large projects on the horizon. The theatre company I work for is doing well and I continually receive new projects to complete. For this summer I need to draft and sew 3 vintage football uniforms for their production Curly Lambeau era 1919-1949 leaves a wide range of dates to look at. Right now I am sewing a Valentine pillow; if everything goes right it should look like a box of chocolates. Then it is on to 2 men's suit coats - Elvis styled. Perhaps after that I will have time to finish the Go Go dress design I have been working on. I will post a few pictures when I finish the smaller projects.
Thursday, September 13, 2012
Life can get in the way
Perhaps I am a bit slow but it seems that the best intentions are often thrown askew by life. I was hoping to get more vintage sewing done this year; I really wanted to broaden my skill set. Alas as of yet that has not happened. Not that the year thus far has been a washout and I have managed to gain a few new skills - just not in the way I imagined. In the past two months I have made one ladies dress jacket, altered three mens' jackets. Altered a bridal gown and created a custom beaded and rhinestone sash. sewed and sent out the first gymnastics leotard for my niece. Sculpted 2 table top jukeboxes and painted the set for the theatre company I work for.
In the next three weeks I need to alter another wedding gown and two bridesmaids dresses for the same wedding, sew a custom designed Halloween costume, creatively dress four actors as historic authors - Edgar Allan Poe, Samuel Clemens, Agatha Christie and Laura Ingalls Wilder for a fundraiser for a local non-profit art group, dye 67 yards of fabric to make the drapery for my living and dining room windows, strip and refinish the hardwood floor in my art studio (just so I can get the cabinets out of the garage before it snows), add additional cross support to my two story porch - and I am sure there are at least another dozen things on that list but right now I am feeling exhausted just thinking about what is to come.
In the next three weeks I need to alter another wedding gown and two bridesmaids dresses for the same wedding, sew a custom designed Halloween costume, creatively dress four actors as historic authors - Edgar Allan Poe, Samuel Clemens, Agatha Christie and Laura Ingalls Wilder for a fundraiser for a local non-profit art group, dye 67 yards of fabric to make the drapery for my living and dining room windows, strip and refinish the hardwood floor in my art studio (just so I can get the cabinets out of the garage before it snows), add additional cross support to my two story porch - and I am sure there are at least another dozen things on that list but right now I am feeling exhausted just thinking about what is to come.
Wednesday, May 23, 2012
Yikes!
Still haven't had any time to do recreational sewing... I will be having family stay with me in early June - been spending lots of time getting things ready. My NEW roof was leaking and damaged the ceiling in the guest room - needed to repair, basement had water in it - clean that up, kitchen drain clogged - time to play plumber, garden needs prepping and plants to outside - whew lots of manual labor, lawnmower stopped running - going to the small engine shop.. I think that may be about it; Oh! how could I forget multiple projects for the theater company I work for and an emergency repair of a custom Elvis jumpsuit. Calgon take me away ( well maybe not... what would be here waiting for me when I got back?) Hoping to get back to sewing soon.
Monday, April 2, 2012
Time to get back to sewing
Happy to report that Grandma is back home from her hospital and rehabilitation stay. This weekend I finished all the required projects for the theatre group ( three 70's styled pull over shirts, 2 gold records and an eight foot long business sign) I also managed to complete the 2 commissioned giant rabbits for another client - at long last I can get back to some of my sewing. I will pick up where I left off; my princess slip is still pinned on the dress form and the pleated flounce still is in pretty good shape.....
Monday, March 12, 2012
Time forgotten
My fun sewing projects are on hold for the moment. I managed to get the flounce pinned on the slip and there is sits on the dress form.


Sunday, February 26, 2012
Everything is on hold
Well any sewing and frivolous pursuits have been temporarily put on hold. My Grandmother is ill and is in the hospital, I have been spending my extra time with her there. I am hoping for a speedy recovery and rapid return home.
Thursday, February 16, 2012
The designer in me

Tuesday, February 14, 2012
Oooh so embarrassed
Looking at the pictures I posted this morning. I forgot to pack away a few Christmas decorations, guess I need to get the ladder out and clean of the china hutch - suppose I could decorate for spring.
In production


Thursday, February 9, 2012
I got one!
Opted in for what they are calling the challenge pattern. It is a lovely full length slip with insertion lace throughout. I have printed the pages off and thanks to my older model printer the pages did not come out in order. Challenge number 1 put the pages back in order.. accomplished. Challenge number 2 to come up with an acceptable substitute for the 12 yards of 1 inch wide insertion lace the pattern calls for. Quality insertion runs about $6.00 per yard, for a trial I need to substitute. Found my answer at work; the fabric department has on clearance "lace" on a spool pre-cut 6inch wide basic lace in a 10 yard length for $2.39 can I argue with that? I plan on cutting it in half and backing it with tulle or organza in a coordinating color. Number 2 challenge overcome this weekend I hope to get some sewing in - after I paint my closet and wallpaper the ceiling.
Sunday, February 5, 2012
It's February..
Well still waiting for my 1912 pattern, I understand the logistics and hassle in getting everything together. I am still organizing my stash. I never realized that in 10+ years of theatre costuming and custom orders I would amass such "wealth " in fabrics and trims. I finally found the back of my storage closet now the fun part.. He he! I am going to paint and install floor to ceiling shelving in my walk in and clean up the mess I created.
Sewing vintage clothing offers a unique challenge and I am hoping to gain a lot of knowledge through this entire project. Not only self realizations but also the combined knowledge of the 400 or so volunteers that are participating. I plan on posting a few pictures of my work room as it progresses. Thank goodness I live in Wisconsin - not too much to do this winter except work indoors.
Sewing vintage clothing offers a unique challenge and I am hoping to gain a lot of knowledge through this entire project. Not only self realizations but also the combined knowledge of the 400 or so volunteers that are participating. I plan on posting a few pictures of my work room as it progresses. Thank goodness I live in Wisconsin - not too much to do this winter except work indoors.
Thursday, January 26, 2012
Still waiting
The assignments still haven't come out yet - but I have been keeping busy cleaning and cooking. I did have a bit of a break; did a bit of set painting for Let Me Be Frank Productions new show... Peter Paul and Frank. I am having sewing withdrawl though.
Subscribe to:
Posts (Atom)